ABC Letter Tracing Coloring Pages
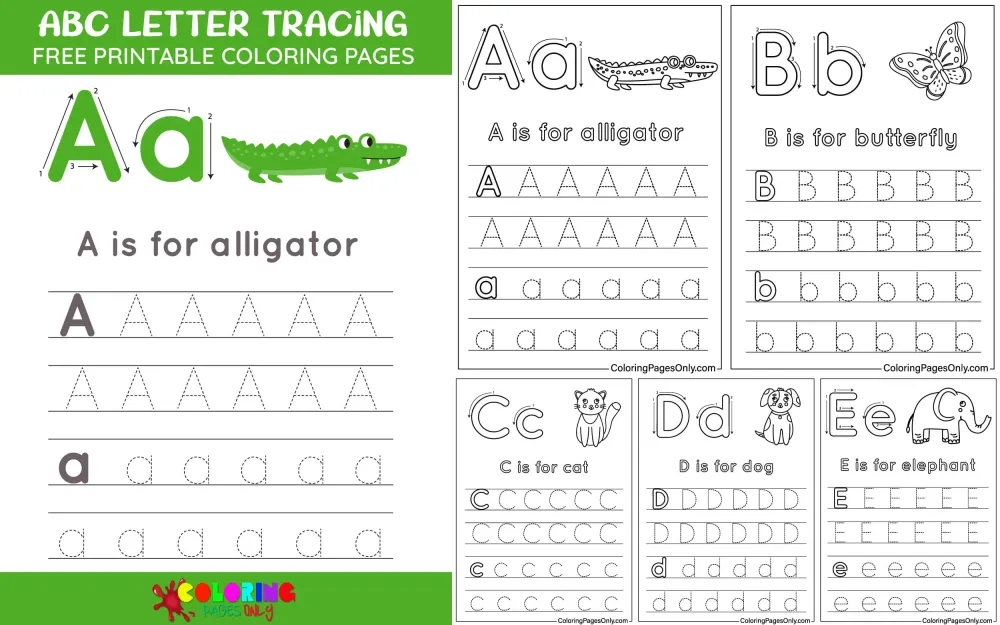
ABC Letter Tracing Coloring Pages at ColoringPagesOnly.com is a complete A–Z set of 26 free printable worksheets combining three learning activities in a single page: uppercase and lowercase letter tracing along dotted guidelines, an animal illustration whose name begins with that letter, and a coloring activity for the animal itself. Every page in the collection follows the same format – an uppercase letter on top with stroke guides, a lowercase letter below, and a friendly animal companion ready to color. Download any page as a free PDF or practice online directly in your browser.
This collection sits within the broader Educational Coloring Pages family. For pure alphabet coloring without tracing, see the full Alphabet Coloring Pages hub with sub-collections for every letter. For number tracing and coloring, see Numbers Coloring Pages.


What Makes This Collection Different – The Hybrid Format
Most early literacy worksheets exist in one of two forms: either a tracing sheet (dotted letters, stroke arrows, repetition rows, no illustration) or a coloring page (illustrated letter with an animal or object, no tracing component). Both have genuine value. But the format used in this collection – tracing integrated with illustration and coloring on a single page – asks the child to engage with each letter across three distinct activities in one sitting, which research in early childhood literacy describes as multi-modal learning: engaging visual recognition, fine motor production, and phonics connection simultaneously.
The sequence within each page matters. The child first sees the letter (visual recognition) while looking at the tracing guidelines. They then form the letter (motor production) by following the dotted stroke path. They simultaneously hear the letter’s sound – if a parent or teacher names the animal and the letter aloud (“This is G – G is for giraffe, and giraffe starts with the /g/ sound”). Then they color the animal (creative engagement), keeping their attention on the page and reinforcing the animal-letter connection through continued visual focus. Each of these steps reinforces a different aspect of early literacy, and doing them in sequence on a single page means the child stays engaged with one letter long enough for the multiple reinforcements to register.
This is also why the animal pairing is not simply decorative. The animal serves a specific phonics function: it anchors the letter’s primary sound in a vivid, memorable image. Neuroscience research on early reading has shown that children form stronger and more durable letter-sound connections when the sound is paired with a concrete, visually engaging referent that they have interacted with – colored, named, looked at carefully – rather than simply seen in passing.
Is Letter Tracing Right for Your Child? – Readiness Signs
Not every child is ready for letter tracing at the same age, and starting before a child is developmentally ready can produce more frustration than progress. The following signs indicate readiness for tracing worksheets:
They can hold a writing tool with a functional grip. This does not need to be a perfect tripod grip – most preschoolers use a modified tripod or quadrupod, and this is normal. What you want to see is the pencil or crayon held between the fingers rather than wrapped in a fist. A fisted grip limits the fine motor control needed to follow a dotted path.
They can trace basic lines and shapes first. Before tracing letters, a child should be comfortable tracing straight lines, curved lines, and circles. If they cannot trace a circle with reasonable accuracy, letter tracing will be too challenging because letters are built from these same basic strokes. The collection’s pages that pair curves (C, O, S) with animal illustrations can actually serve as entry-point assessments: if your child can trace the curved C alongside the cat with reasonable accuracy, they are ready for the full alphabet.
They show interest in letters. Readiness is never just physical – motivation drives engagement. A child who points at words, asks “what does that say?”, tries to write their own name, or shows curiosity about specific letters is primed for tracing practice in a way that a physically ready but disinterested child is not.
They are approximately 4 to 6 years old. Most children begin uppercase letter tracing between ages 3 and 5, with lowercase tracing following at ages 4 to 6. These are developmentally appropriate ranges, not strict rules – some children are ready at 3, others at 5, and both timelines are within the range of typical development.
The Complete A–Z Animal Guide
Each page in this collection pairs one letter with one animal whose name begins with that letter’s primary sound. Here is the full guide to which animal appears on each page and why the pairing works:
A – Alligator. The short /a/ sound in alligator is the primary vowel sound associated with the letter A in English phonics instruction. Alligators are also visually dramatic – long, textured, visually complex – making the A page one of the most coloring-rich in the collection.
B – Butterfly. The /b/ sound in butterfly is clean and unambiguous. The butterfly’s wing symmetry makes this one of the most artistically engaging pages – the two wings invite color-matching or contrasting patterns.
C – Cat. Cat establishes the hard /k/ sound of C, the most common sound this letter makes, before children encounter the soft /s/ sound (as in city). Cats are familiar and require careful coloring of details: whiskers, paw pads, and ear shapes.
D – Dog. Dog is one of the first three words most children learn to recognize in print, making D-for-dog one of the most personally resonant letter-animal pairings in literacy instruction. Dogs also appear in an enormous variety, giving children creative freedom in their coloring choices.
E – Elephant. Elephant uses the short /e/ sound, establishing E’s primary phonics identity. Elephants’ grey wrinkled texture makes this a technically interesting coloring challenge – shading and blending work particularly well here.
F – Fox. Fox connects F to its crisp initial /f/ sound. The fox’s warm red-orange coat provides a vivid, specific color reference, and the pointed ears, bushy tail, and white underbelly make this one of the more detail-rich pages for careful colorists.
G – Giraffe. Giraffe uses the hard /g/ sound (same as go, get, game) – the most common G sound in English. The giraffe’s distinctive, patterned coat (irregular brown patches on pale yellow) makes this one of the most unique coloring challenges in the set.
H – Hedgehog. Hedgehog is a deliberately unusual choice over the more common horse or hen, and for good reason: the hedgehog is visually distinctive and immediately interesting to children. Its spines, small round face, and tucked position when resting are immediately recognizable as delightful.
I – Iguana. Iguana uses the short /i/ sound. Iguanas, with their ridged spines, scaled texture, and vivid green coloring, are one of the most visually striking animals in the collection – this page rewards careful attention to color layering.
J – Jellyfish. Jellyfish offers an unusual and memorable J word – more interesting for children than jar or jug. The translucent, flowing quality of a jellyfish is a distinct coloring challenge, as it rewards soft, light applications of blue, purple, and pale pink.
K – Koala. Koala gives K a clear initial /k/ sound. Koalas’ soft grey fur, distinctive large nose, and small, rounded ears make this a coloring page that young children find emotionally appealing. The koala’s expression – often shown resting – conveys calm and gentleness.
L – Lion. Lion gives L its clean /l/ sound. The lion’s mane is this page’s distinctive coloring challenge: warm golden-yellow for the body, deeper amber-brown for the mane, with careful attention to the gradient between them.
M – Monkey. Monkey uses the /m/ sound clearly. Monkeys are often depicted in dynamic poses – swinging, climbing, or reaching – giving this page movement and energy that rewards coloring with warm browns, peach face patches, and expressive eyes.
N – Narwhal. Narwhal is a memorable, unusual choice for N – far more interesting to children than nose or nut. The narwhal’s distinctive spiraling tusk and smooth, pale grey-blue body make this a simple but striking page. Learning that narwhals are real animals (not mythological, despite resembling a sea unicorn) is itself a delightful fact for young children.
O – Owl. Owl uses the /ow/ sound of O’s short form. Owls’ large, round eyes, heart-shaped or rounded faces, and feathered bodies make them one of the most detail-rich animal illustrations for coloring. Brown, amber, rust, and cream are the dominant palettes.
P – Parrot. Parrot gives P its clear /p/ sound and offers the most vivid, multi-colored coloring opportunity in the entire collection. Parrots can legitimately be colored in red, green, blue, yellow, orange, or any combination – giving children complete creative latitude while staying accurate.
Q – Quail. Quail is the standard solution to Q’s phonics challenge – almost no common English words begin with the /kw/ sound of Q, and they are also visually recognizable animals. The quail’s distinctive topknot feather makes it immediately recognizable, and its speckled feather pattern is a coloring detail worth pointing out.
R – Rhinoceros Beetle. The rhinoceros beetle is a uniquely bold choice – not rhinoceros (the mammal), but the insect named for its horn-like protrusion. This choice signals that the collection is interested in introducing children to genuinely unusual animals rather than defaulting to the obvious. The beetle’s dark, iridescent shell (dark brown to almost black, with potential blue-green shimmer) is distinctive.
S – Squirrel. Squirrel gives S its primary /s/ sound. Squirrels’ bushy tails, round eyes, and characteristic posture holding a nut are familiar and endearing. The warm grey-brown coat with cream underside and the acorn (if shown) provide clear color guidance.
T – Tiger. Tiger gives T its clean /t/ sound and offers one of the most distinctive coloring challenges in the collection: the orange body and black stripe pattern of the Bengal tiger. Achieving the stripe pattern with crayons or colored pencils is itself a worthwhile skill-building exercise.
U – Unicorn. The unicorn is the imaginative solution to U’s phonics limitation – very few real animals have names beginning with the short /u/ sound. The unicorn (or occasionally umbrella bird) allows children to color a fantastical creature with complete creative freedom in palette choice.
V – Vulture. Vulture introduces V’s /v/ sound alongside one of nature’s more unusual birds – a choice that expands children’s vocabulary well beyond the typical violin or vase associations.
W – Wolf. Wolf uses the W’s /w/ sound clearly. The wolf’s dignified, strong posture and grey-silver coat make this a coloring page that appeals to children who prefer bold, dramatic animal illustrations.
X – X-ray Fish. X presents the hardest phonics-illustration challenge in any alphabet set, since almost no English words begin with the X sound at the start of a word. The x-ray fish (Pristella maxillaris) is the standard solution – a small freshwater fish named for its translucent body through which the skeleton is partially visible. This page is often a jumping-off point for a conversation about unusual animals.
Y – Yak. Yak is the most common Y-animal pairing in literacy materials, giving the letter its /y/ sound clearly. The yak’s long, shaggy, dark coat and curved horns make it visually distinctive, and unlike any animal most children have colored before.
Z – Zebra. Zebra gives Z its /z/ sound and the most graphically distinctive coloring challenge in the collection: the iconic black-and-white stripe pattern. Unlike most other animals in the set, zebra coloring has a definitive right answer, which actually reassures children who want to be accurate while giving them practice in precise pattern execution.
Stroke Order – How to Trace Each Letter Correctly
Correct stroke order is the most important technical aspect of letter tracing practice, and it is the piece most commonly neglected when children trace independently without guidance. Stroke order matters because the sequence of movements used to form a letter becomes motor memory – once established, it is difficult to change. Children who learn incorrect stroke sequences often struggle to write fluently later because they have to “unlearn” the motor pattern they’ve practiced.
Every letter in this collection includes dotted guidelines and typically a starting point marker. Here are the stroke order principles that apply across the entire alphabet:
Always start from the top. The single most important rule of English letter formation is that almost every letter begins at the top – either the very top of the letter or a specific point on the upper portion. Children who start letters from the bottom produce letters that look different from standard forms and create motor patterns that slow them down as writing becomes more complex. When guiding a child through any page in this collection, the first instruction should always be: “Put your pencil at the top.”
Letters grouped by stroke type make learning more efficient. Rather than teaching letters in alphabetical order (which groups visually and motorically unrelated letters together), most handwriting researchers recommend teaching in stroke-family groups. The pages in this collection can be used in any order, but consider this sequence for maximum efficiency:
Straight-line letters first – I, L, T, H, E, F – because they require only vertical and horizontal strokes. L is often the very first letter children can form independently, being just two straight lines meeting at a corner. Build confidence here before moving to more complex forms.
Single-curve letters next – C, O, U, J – because they involve one continuous curved stroke. C and O are natural starting points for curve work. The letter L is often the first independently written letter; C and O are often second.
Combined straight-and-curve letters – B, D, G, P, Q, R – these require a straight line and then a separate curve, or a curve attached to a vertical stroke. These letters form the middle difficulty tier.
Diagonal letters last – A, K, M, N, V, W, X, Y, Z – because diagonal strokes are the hardest fine motor movement for young children. The muscles required to produce a controlled diagonal line at a specific angle are typically the last to develop in the pre-writing sequence.
Uppercase before lowercase for each letter. Uppercase letters are universally easier for beginners because they have simpler starting points (only two starting positions across the whole uppercase alphabet: top-left or top-center), consistent height (they all sit on the same baseline and reach the same top line), and no reversal confusion. Lowercase letters introduce the significant challenge of letter reversals – b and d, p and q are mirror images that many children confuse until well into first grade. Each page in this collection shows uppercase on top and lowercase below, which is the correct instructional order.
Pencil Grip – Setting Up for Success Before the First Stroke
Before any tracing begins, the pencil grip deserves attention. The ideal grip for early writing is the dynamic tripod grip: the pencil rests on the middle finger, held in place by the thumb and index finger, with the ring and pinky fingers curled gently into the palm for stability. This grip allows the fine finger movements that letter formation requires.
However, many preschoolers naturally use a quadrupod grip (four fingers instead of three) or a slight variation of the tripod, and this is perfectly acceptable at this stage. What to avoid: a fisted grip where the entire hand wraps around the pencil, and a thumb-cross grip where the thumb crosses over the index finger. Both of these limit finger mobility and will create difficulties as writing demands increase.
If a child struggles with grip, the most effective intervention is not correcting the grip directly (children revert the moment attention moves elsewhere) but addressing the underlying fine motor strength. Activities that build grip strength include: threading beads, squeezing playdough, using tweezers to pick up small objects, tearing paper, lacing cards, and using short pencils or broken crayons that force the fingertips to engage rather than the whole palm.
Tracing Tips for Each Page
Trace with a finger first, then a pencil. Before putting pencil to paper, have the child trace the dotted letter with their index finger – following the stroke path in the air above the page or touching the dotted lines directly. This builds the motor plan (the sequence of movements the hand will make) before the child has to coordinate that plan with the physical demands of pencil pressure and line accuracy. Finger tracing is also forgiving – there is no mark left, so there is no anxiety about staying on the line.
Say the letter name and animal name as you trace. Every stroke of the letter should be accompanied by the letter name: “A – A is for alligator.” After tracing, name the animal and its starting sound: “Alligator starts with /a/.” This verbal reinforcement during the motor activity is what creates the letter-sound-animal connection that makes the hybrid format more effective than tracing alone.
Slow down at curves and direction changes. Speed is the enemy of accuracy in early tracing. Children who rush through curved letters end up producing angular approximations – a C that looks like a V, an S that looks like a Z. The S page with the squirrel is a particularly important one to slow down on: S changes direction twice (first curves one way, then reverses), which is the most complex single-letter stroke sequence in the alphabet. Point out the direction change explicitly before the child traces it: “Watch – the line goes this way, then it turns around and goes the other way.”
Use the coloring as a reset. If a child becomes frustrated with tracing a particularly difficult letter, the coloring portion of the same page is a natural, low-stakes reset. Coloring the fox or the tiger requires none of the stroke-accuracy pressure of tracing, while keeping the child engaged with the same letter. After coloring, return to the tracing – the break typically reduces frustration significantly.
Laminate for repeated practice. The hybrid format of these pages – tracing plus coloring – means that a single PDF printed once provides one use. For children who need more tracing repetitions before moving to the coloring phase, consider laminating the printed page and using a dry-erase marker for the tracing portion. The coloring can then be done on a separate printed copy. This approach is particularly effective for letters the child finds difficult – K, S, X – where many tracing repetitions are beneficial before the motor pattern is established.
5 Activities
The stroke-by-stroke building game. Before coloring or tracing any page, take the uppercase letter and break it into its individual strokes by talking through it aloud. For the letter A: “We go diagonally down to the left – that’s stroke 1. We go diagonally down to the right – that’s stroke 2. We go across the middle – that’s stroke 3.” Have the child count the strokes with you, holding up a finger for each one. Then trace while counting again (“1… 2… 3!”). Then let the child trace independently while counting their strokes aloud. This activity builds stroke awareness – the understanding that every letter is built from a specific number of movements in a specific order – which is the foundational cognitive skill that supports fluent, independent writing later. The animal on each page serves as the reward: “After three strokes for A, you get to color your alligator!”
The animal color research project. Before coloring the animal on any page, spend 30 seconds researching the animal’s actual colors. “What color is a real fox?” (Orange-red body, white face and chest and tail tip, black legs and ears.) “What color is a real narwhal?” (Grey-blue, almost no other color.) “Is a real squirrel brown, grey, or red?” (Depends on the species – grey squirrels in North America; red squirrels in Europe; black squirrels exist too.) The child then decides: will they color the animal realistically (matching actual animal colors) or creatively (any colors they choose)? Both choices are legitimate, but making a conscious choice develops intentionality in coloring. This activity also builds natural world knowledge alongside literacy skills, which is exactly what strong early childhood education does: integrate learning across subject areas rather than siloing them.
The Letter of the Day routine. Instead of working through the collection in alphabetical order, designate one letter per school day (or one per week for a slower, deeper pace). On that day: trace the letter page in the morning as a warm-up activity, say the letter’s sound every time you encounter that letter in books or signs during the day (“Look – that word starts with F, just like fox!”), find three objects in your home that start with that letter, and color the animal on the page in the afternoon as a creative close. By the end of 26 days or 26 weeks, the child has a complete colored collection AND a deeply embedded letter-sound repertoire for all 26 letters. This routine uses spaced repetition – the same letter encountered multiple times throughout the day – which is consistently identified in memory research as more effective than massed practice (doing all tracing at once).
The tracing comparison chart. After completing all 26 pages, review them together and sort by difficulty: which letters does the child feel they trace most easily and confidently? Which feels hardest? Create a simple three-column chart labeled EASY, MEDIUM, HARD, and place each letter page into a pile. The letters in the HARD pile then become the focus of additional practice – using the laminate-and-dry-erase method described in the tips above. This activity teaches children a study skill that will serve them throughout their education: self-assessment, identifying what they know versus what needs more work, and directing practice toward areas of difficulty rather than areas of comfort. It also gives parents and teachers specific, actionable information about which letters need more support.
The animal alphabet storytelling game. After all 26 pages are colored, spread them out on the floor in alphabetical order. Then make up a story together that includes all 26 animals in order: “One day, an Alligator met a Butterfly near a Cat’s house. The Dog barked at the Elephant, who surprised the Fox…” The child can point to each animal’s page as it enters the story. This game reinforces alphabetical sequence (essential for dictionary skills, reference skills, and alphabetical filing throughout education), keeps the letter-animal connection active in memory after the worksheets are completed, and develops narrative language skills through collaborative story-making. The coloring the child has done on each page makes each animal feel personally owned – the pink fox with the purple tail tip is their fox, which makes it a more engaged storytelling participant than a generic illustration.
The Research – What Tracing Does and Doesn’t Do
The question of whether letter tracing is beneficial for young children has a more nuanced answer than it might appear.
The evidence for tracing’s benefits is solid in the area of fine motor development. When children trace letter shapes, they engage the small muscles of the hand and fingers, build hand-eye coordination, develop pencil control, and practice the sustained, focused attention that writing requires. These benefits are real and well-documented. Research published in Reading and Writing (2023) found that fine motor skill involvement during letter learning produced learning gains that persisted to follow-up testing, supporting the value of motor engagement in literacy activities.
Research by James and Engelhardt (2012) found that handwriting promoted reading acquisition in pre-literate children more effectively than typing. Writing by hand engages a specific brain region – the fusiform gyrus – associated with letter processing in literate individuals, and this engagement is stronger for handwriting than for typing.
At the same time, some early childhood specialists note a nuance worth understanding: children who trace letter outlines sometimes focus more on staying within the dotted lines than on learning the letter’s overall form, which can produce accurate tracing without genuine letter internalization. The hybrid format of these pages – where tracing is paired with an animal illustration and coloring activity – directly addresses this concern by giving children additional, non-tracing engagement with the same letter. The animal image ensures the child is looking at, thinking about, and working with the letter’s associated content even when the tracing portion is complete.
For children under 4, or those who are not yet developmentally ready for letter tracing, the coloring portions of these pages remain fully appropriate – the animal illustrations can be colored without any tracing, and the letter form will still be passively absorbed through visual engagement. This makes the collection genuinely useful across a wider readiness range than a pure tracing worksheet set.
